1_Dialogs_and_Regex:
Estimated Time: 60-75 minutes
Building a Bot
We assume that you’ve had some exposure to the Bot Framework. If you have, great. If not, don’t worry too much, you’ll learn a lot in this section, but you may want to take it slow. We recommend completing this tutorial and checking out the documentation.
Regardless of your experience with bots, you should review this page before starting the lab.
Lab 1.1: Setting up for bot development
We will be developing a bot using the latest .NET SDK (v4). To get started, we’ll need to download the Bot Framework Emulator, and we’ll need to create a Web App Bot and get the source code.
Download the Bot Framework Emulator
You can download the v4 Preview Bot Framework Emulator for testing your bot locally. The instructions for the rest of the labs will assume you’ve downloaded the v4 Emulator (as opposed to the v3 Emulator). Download the emulator by going to this page and downloading the most recent version of the emulator that has the tag “Latest Release” (select the “.exe” file, if you are using windows).
The emulator installs to c:\Users\your-username\AppData\Local\botframework\app-version\botframework-emulator.exe or to your Downloads folder, depending on browser.
Now that you’ve downloaded and open the Bot Emulator, the next thing you have to set up is ngrok, which allows us to connect to bots hosted remotely. While most of the testing we’ll do is local, you’ll need ngrok to access the published version of the bot in the Emulator. There are two main steps to set this up:
- Download ngrok from this website: https://ngrok.com/download. Click “Save as” when you download it so you can control where it gets saved (pick your Documents or Downloads folder, it should default to Downloads). Next, navigate to the install location and unzip the file (right click and select “Extract all…”) and extract it one level up from the downloaded file (e.g. to C:\Users\antho\Downloads).
- Open the Bot Framework Emulator and hit the settings button (gear icon in bottom left corner). In the “Path to ngrok” box, hit “Browse,” find “ngrok.exe”, click “Select ngrok”, and then click “Save”.
Create an Azure Web App Bot
A bot created using the Microsoft Bot Framework can be hosted at any publicly-accessible URL. For the purposes of this lab, we will register our bot using Azure Bot Service.
Navigate to the portal. In the portal, click “Create a resource” and search for “bot”. Select “Web App Bot”, and click create. For the name, you’ll have to create a unique identifier. I recommend using something along the lines of PictureBot[i][n] where [i] is your initials and [n] is a number (e.g. mine would be PictureBotamt6). Put in the region that is closest to you. For pricing tier, select F0, as that is all we will need for this workshop. Select a Bot template of SDK v4 for Echo Bot in C#, we will update this code to be our PictureBot. Configure a new App service plan (put it in the same location as your bot). You can choose to turn Application Insights on or off. Do not change or click on “Auto create App ID and password”, we will get to that later. Click create.

When it’s deployed, go to the Web App Resource. You have just deployed a very simple EchoBot with the Echo Bot template. If you wish, you can select the “Test in WebChat” tab once it’s deployed, and see what it is capable of doing.
Since this isn’t the bot we set out to build, the next thing you need to do is download the source code. We’ll edit this throughout the next few labs, and then we’ll publish it back to this service.
Navigate to the “Build” tab within the portal, and select “Download Bot source code”. Save it somewhere convenient and extract all the files from the zip file.
While you’ve got the Azure portal open, now is also a good time to find and save the botFilePath and botFileSecret located in App Service Settings > Application Settings > Application settings section of your Web App Bot service.
For future bot-building ventures, you can either start by creating a bot in the portal and downloading the source code (which is what we’re doing here), or you can use the Bot Builder template, and we’ve provided instructions on how to do that:
Download the Bot Builder SDK v4 Template for C# here and click “Save as” to save it to your Visual Studio ItemTemplates folder for Visual C#. This is typically located in
C:\Users\your-username\Documents\Visual Studio 2017\Templates\ItemTemplates\Visual C#. Navigate to the folder location and double-click on the install and click “Install” to add the template to your Visual Studio templates. Depending on your browser, when you download the template, you can double-click on it and install it directly to Visual Studio Community 2017; that is fine.
Lab 1.2: Creating a simple bot and running it
Navigate to the solution file for the Web App Bot you just created, and open it in Visual Studio (in future bots, you can use Visual Studio Code, but for the purposes of these labs, you should use Visual Studio). Spend some time looking at all of the different things you get built in from the Echo Bot template. We won’t spend time explaining every single file, but we highly recommend spending some time later working through and reviewing this sample (and the other Web App Bot sample - Basic Bot), if you have not already. It contains important and useful shells needed for bot development. You can find it and other useful shells and samples here.
For the purposes of this lab, we will modify aspects of the template to fit our needs, which is what you would likely do in the real world as well.
Start by right-clicking on the Solution and selecting “Build”. This will load up the packages. Next, in the “appsettings.json file, update it to include the following, adding your bot service information as well:
{
    "botFilePath": "YourBotFilePath",
    "botFileSecret": "YourBotFileSecret"
}
Next, we’ll focus on the NuGet packages we need. Right-click on the solution in Solution Explorer and select “Manage NuGet Packages for Solution.”
Do not update Microsoft.AspNetCore.All or Microsoft.AspNetCore.
In the “Updates” tab, update the following packages in order to 4.0.7:
- Microsoft.Bot.Configuration
- Microsoft.Bot.Schema
- Microsoft.Bot.Connector
- Microsoft.Bot.Builder
- Microsoft.Bot.Builder.Integration.AspNet.Core
- Microsoft.Bot.Builder.Azure
Do not update Microsoft.AspNetCore.All or Microsoft.AspNetCore.
Next, click the “Browse” tab, and install all of the packages listed below. Make sure you check the box “Include prerelease” and are on the “Browse” tab:
- Microsoft.Bot.Builder.AI.Luis
- Microsoft.Bot.Builder.Dialogs
- Microsoft.Azure.Search
Finally, in the solution explorer, navigate to Dependencies > NuGet and remove the following packages:
You can also remove “EchoBotWithCounter.ruleset” from the root project directory, as that’s what the packages are used to create. These can be useful packages for production bots that make sure you’ve standardized your coding and commenting style. Exploring them is beyond the scope of this workshop, but you can learn more about them at the links provided above.
After you’ve installed them, under Dependencies > NuGet in your Solution Explorer, you should see the following packages:
- Microsoft.AspNetCore
- Microsoft.AspNetCore.All
- Microsoft.Azure.Search
- Microsoft.Bot.Builder
- Microsoft.Bot.Builder.AI.Luis
- Microsoft.Bot.Builder.Azure
- Microsoft.Bot.Builder.Dialogs
- Microsoft.Bot.Builder.Integration.AspNet.Core
- Microsoft.Bot.Configuration
- Microsoft.Bot.Connector
- Microsoft.Bot.Schema
- Microsoft.Extensions.Logging.AzureAppServices
As you probably know, renaming a Visual Studio Solution/Project is a very sensitive task. Carefully complete the following tasks so all the names reflect PictureBot instead of EchoBot:
Note: Renaming files in Visual Studio can take up to 15 seconds while all the references are being resolved. If time is not given for this to occur, the build will fail which may require you to manually resolve the refactored objects. Have patience.
- Rename the solution then project from “EchoBotWithCounter” to “PictureBot”. Close and reopen Visual Studio.
- Open Program.cs, highlight “BotBuilderSamples” and right-click to select “Rename”. Check the boxes to rename all occurrences in strings and comments. Rename it to PictureBot and select “Apply”.
- Open Properties > launchSettings.json and replace “EchoBotWithCounter” to “PictureBot”.
- Open wwwroot > default.htm, and replace the occurrences of “Echo bot with counter sample” and “Echo with Counter Bot” with “PictureBot”.
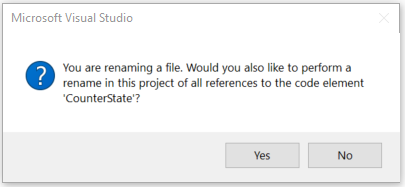
- Rename “CounterState.cs” to “PictureState.cs” Note: Do this by right-clicking on the file and selecting “Rename”. You’ll get a pop-up similar to the image below. Select “Yes”. Do this for every file you’re asked to rename.
- Rename “EchoBotAccessors.cs” to “PictureBotAccessors.cs”
- Rename “EchoWithCounterBot.cs” to “PictureBot.cs”
- Rename “EchoBotWithCounter.deps.json” to “PictureBot.deps.json”
- “EchoBotWithCounter.runtimeconfig.json” to “PictureBot.runtimeconfig.json”
- Build the solution.
TIP: If you only have one monitor and you would like to easily switch between instructions and Visual Studio, you can now add the instruction files to your Visual Studio solution by right-clicking on the project in Solution Explorer and selecting Add > Existing Item. Navigate to “lab02.2-bulding_bots,” and add all the files of type “MD File.”
Creating a Hello World bot
So now that we’ve updated our base shell to support the naming and NuGet packages we’ll use throughout the rest of the labs, we’re ready to start adding some custom code. First, we’ll just create a simple “Hello world” bot that helps you get warmed up to building bots with the V4 SDK.
For the purposes of this section of the lab, navigate to the ConfigureServices method in Startup.cs and comment out (using //) the line CounterState = conversationState.CreateProperty<CounterState>(PictureBotAccessors.CounterStateName),. We’ll talk about state and accessors in future sections.
The only other file we need to update to get “Hello world” working is “PictureBot.cs”. Open the file and review the comments.
Once you feel semi-comfortable with the code/comments, replace the OnTurnAsync method with the code below. This method is called every turn of the conversation. You’ll see later why that fact is important, but for now, remember that OnTurnAsync is called on every turn.
Aside: A “turn” is used to describe a message to a user and a response from the bot. For example, if I say “Hello bot” and the bot responds “Hi, how are you?” that is one turn.
        /// <summary>
        /// Every conversation turn for our PictureBot will call this method.
        /// There are no dialogs used, since it's "single turn" processing, meaning a single
        /// request and response. Later, when we add Dialogs, we'll have to navigate through this method.
        /// </summary>
        /// <param name="turnContext">A <see cref="ITurnContext"/> containing all the data needed
        /// for processing this conversation turn. </param>
        /// <param name="cancellationToken">(Optional) A <see cref="CancellationToken"/> that can be used by other objects
        /// or threads to receive notice of cancellation.</param>
        /// <returns>A <see cref="Task"/> that represents the work queued to execute.</returns>
        /// <seealso cref="BotStateSet"/>
        /// <seealso cref="ConversationState"/>
        /// <seealso cref="IMiddleware"/>
        public async Task OnTurnAsync(ITurnContext turnContext, CancellationToken cancellationToken = default(CancellationToken))
        {
            // If the user sends us a message
            if (turnContext.Activity.Type is "message")
            {
                {
                    await turnContext.SendActivityAsync($"Hello world.");
                }
            }
        }
Now start your bot (with or without debugging) by pressing the button that looks like a play button, it should say “PictureBot” (or by hitting F5 on your keyboard). NuGet should take care of downloading the appropriate dependencies. You may hit some break points, remove them and select “Contiue” (by the play button).
A few things to note:
- Your default.htm (under wwwroot) page will be displayed in a browser
- Note the localhost port number for the web page. This should (and must) match the endpoint in your Emulator.
- You’ll also see a console window, which, if you were using Visual Studio Code, would just be the Output in the terminal after you submit
dotnet run. You can ignore this for the purposes of these labs.
Get stuck or broken? You can find the solution for the lab up until this point under resources/code/FinishedPictureBot-Part0. The readme file within the solution (once you open it) will tell you what keys you need to add in order to run the solution.
Using the Bot Framework Emulator
To interact with your bot:
- Launch the Bot Framework Emulator (note we are using the v4 PREVIEW Emulator).
- Select “Open bot” on the Welcome page and navigate to the file ending in “.bot” in the root of your project. You’ll be asked to enter your
botSecret. - Now, you should be able to click the message tab (on the left menu) and ‘development’ listed under “ENDPOINT.” You should also see a ‘production’ endpoint listed, which we’ll discuss next.
- You should now be able to converse with the bot.
- Type “hello”, and the bot will respond with “Hello World” to every message.
- You can select “Start Over” to clear the conversation history.
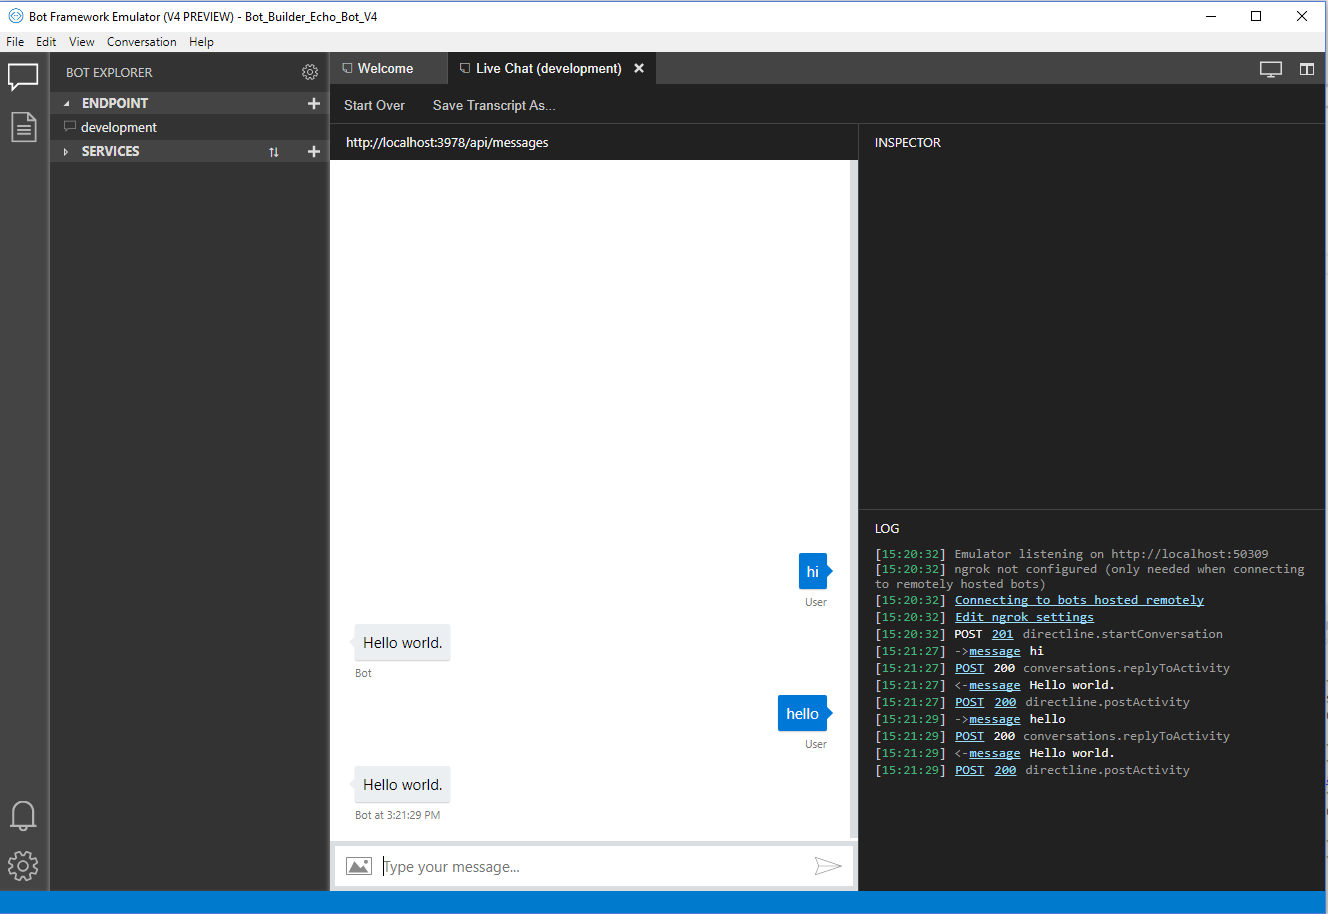
In the Log, you should see something similar to the following:

Note how it says we will bypass ngrok for local addresses. So we’re not using ngrok at the moment, but we will if we’re connecting to our published version of the bot, which you can access in the ‘production’ endpoint. Open the ‘production’ endpoint and observe the differences. This can be a useful feature when you’re testing and comparing your development bot to your production bot.
You can read more about using the Emulator here.
Aside: why this port number? It is set in your project properties. In your Solution Explorer, double-click Properties>Debug and examine its contents. Does the App URL match what you connected to in the emulator?
Browse around and examine the sample bot code. In particular, note:
- Startup.cs is where we will add services/middleware and configure the HTTP request pipeline. There are many comments within to help you understand what is happening. Spend a few minutes reading through.
- In PictureBot.cs,
OnTurnAsyncis the entry point which waits for a message from the user, andturnContext.Activity.Type is "message"is where we can react to a message once received and wait for further messages. We can useturnContext.SendActivityAsyncto send a message from the bot back to the user.
Lab 1.3: Managing state and services
Navigate again to the Startup class. Review it if you have not already. Then, update the list of using statements by adding the following:
using System.Text.RegularExpressions;
using Microsoft.Bot.Builder.AI.Luis;
We won’t use the above just yet, but can you guess when we might?
Focus your attention on the ConfigureServices method which is used to add services to the bot. Review the contents carefully, noting what is built in for you.
A few other notes for a deeper understanding:
- If you’re unfamiliar with dependency injection, you can read more about it here.
- You can use local memory for this lab and testing purposes. For production, you’ll have to implement a way to manage state data. In the big chunk of comments within
ConfigureServices, there are some tips for this.- At the bottom of the method, you may notice we create and register state accessors. Managing state is a key in creating intelligent bots, which you can read more about here.
Fortunately, this shell is pretty comprehensive, so we only have to add two items: middleware and custom state accessors.
Middleware
Middleware is simply a class or set of classes that sit between the adapter and your bot logic, added to your adapter’s middleware collection during initialization. The SDK allows you to write your own middleware or add reusable components of middleware created by others. Every activity coming in or out of your bot flows through your middleware. We’ll get deeper into this later in the lab, but for now, it’s important to understand that every activity flows through your middleware, because it is located in the ConfigureServices method that gets called at run time (which runs in between every message being sent by a user and OnTurnAsync). Add the following code on the line following options.State.Add(conversationState);:
                var middleware = options.Middleware;
                // Add middleware below with "middleware.Add(...."
                // Add Regex below
Custom state accessors
Before we talk about the custom state accessors that we need, it’s important to back up. Dialogs, which we’ll really get into in the next section, are an approach to implementing multi-turn conversation logic, which means they’ll need to rely on a persisted state to know where in the conversation the users are. In our dialog-based bot, we’ll use a DialogSet to hold the various dialogs. The DialogSet is created with a handle to an object called an “accessor”.
In the SDK, an accessor implements the IStatePropertyAccessor interface, which basically means it provides the ability to get, set, and delete information regarding state, so we can keep track of which step a user is in a conversation.
For each accessor we create, we have to first give it a property name. For our scenario, we want to keep track of a few things:
PictureState- Have we greeted the user yet?
- We don’t want to greet them more than once, but we want to make sure we greet them at the beginning of a conversation.
- Is the user currently searching for a specific term? If so, what is it?
- We need to keep track of if the user has told us what they want to search for, and what it is they want to search for if they have.
- Have we greeted the user yet?
DialogState- Is the user currently in the middle of a dialog?
- This is what we’ll use to determine where a user is in a given dialog or conversation flow. If you aren’t familiar with dialogs, don’t worry, we’ll get to that soon.
- Is the user currently in the middle of a dialog?
You can see in the code below, the EchoBot template (the template we started from) had a custom state accessor that acted as a counter to keep track of the number of turns in a conversation (or “CounterState”):
                // Create the custom state accessor.
                // State accessors enable other components to read and write individual properties of state.
                var accessors = new PictureBotAccessors(conversationState)
                {
                    //CounterState = conversationState.CreateProperty<PictureState>(PictureBotAccessors.CounterStateName),
                };

                return accessors;
We won’t count turns, but we can use a similar construct to keep track of what we’ll call PictureState. Using the same naming conventions as CounterState, add PictureState within the list of custom state accessors.
Finally, to keep track of the dialogs, you’ll use the built-in DialogState, by adding the following line to your list of custom state accessors:
DialogStateAccessor = conversationState.CreateProperty<DialogState>("DialogState"),
You should see an error (red squiggly) beneath some of the terms. But before fixing them, you may be wondering why we had to create two accessors, why wasn’t one enough?
DialogStateis a specific accessor that comes from theMicrosoft.Bot.Builder.Dialogslibrary. When a message is sent, the Dialog subsystem will callCreateContexton theDialogSet. Keeping track of this context requires theDialogStateaccessor specifically to get the appropriate dialog state JSON.- On the other hand,
PictureStatewill be used to track particular conversation properties that we specify throughout the conversation (e.g. Have we greeted the user yet?)
Don’t worry about the dialog jargon yet, but the process should make sense. If you’re confused, you can dive deeper into how state works.
Now back to the errors you’re seeing. You’ve said you’re going to store this information, but you haven’t yet specified where or how. We have to update “PictureState.cs” and “PictureBotAccessor.cs” to have and access the information we want to store.
Navigate to “PictureState.cs”. This is where we’ll store information about the active conversation. You’ll notice that we have an integer that we’re storing called TurnCount. Can you guess what this was for in EchoBotWithCounter?
Since we aren’t tracking turns, but we are tracking other things, remove TurnCount and add in its place:
        public string Greeted { get; set; } = "not greeted";
        public string Search { get; set; } = "";
        public string Searching { get; set; } = "no";
Feel free to add some comments explaining the purposes of the strings. Now that you have PictureState appropriately initialized, you can update PictureBotAccessor, to remove the errors you were getting in “Startup.cs”.
Navigate to “PictureBotAccessors.cs” and locate CounterStateName and CounterState. Using what’s provided for CounterState as a template, implement what you need for PictureStateName and PictureState.
Finally, add the following code so you can use DialogSets through the dialog state (to be explained shortly):
        /// <summary> Gets the IStatePropertyAccessor{T} name used for the DialogState accessor. </summary>
        public static string DialogStateName { get; } = $"{nameof(PictureBotAccessors)}.DialogState";

        /// <summary> Gets or sets the IStatePropertyAccessor{T} for DialogState. </summary>
        public IStatePropertyAccessor<DialogState> DialogStateAccessor { get; set; }
You’ll need to add a using statement to “PictureBotAccessor.cs” and “Startup.cs” - can you figure out which one? This package is the same package that contains a lot of tools for constructing dialogs.
Wondering if you configured it correctly? Return to “Startup.cs” and confirm your errors around creating the custom state accessors have been resolved.
Lab 1.4: Organizing Code for Bots
There are many different methods and preferences for developing bots. The SDK allows you to organize your code in whatever way you want. In these labs, we’ll organize our conversations into different dialogs, and we’ll explore a MVVM style of organizing code around conversations.
This PictureBot will be organized in the following way:
- Dialogs - the business logic for editing the models
- Responses - classes which define the outputs to the users
- Models - the objects to be modified
Before we get into it, create two folders “Responses” and “Models” within your project. (Hint: You can right-click on the project and select “Add”).
Dialogs
If you developed bots with the Bot Framework SDK (v3), then you’re probably familiar with Dialogs and how they work. If you aren’t, read this page on Dialogs before continuing.
When a bot has the ability to perform multiple tasks, it is nice to be able to have multiple dialogs, or a set of dialogs, to help users navigate through different conversation flows. For our PictureBot, we want our users to be able to go through an initial menu flow, often referred to as a main dialog, and then branch off to different dialogs depending what they are trying to do - search pictures, share pictures, order pictures, or get help. We can do this easily by using a dialog container or what’s referred to here as a DialogSet. Read about creating modular bot logic and complex dialogs before continuing.
For the purposes of this lab, we are going to keep things fairly simple, but after, you should be able to create a dialog set with many dialogs. For our PictureBot, we’ll have two main dialogs:
- MainDialog - The default dialog the bot starts out with. This dialog will start other dialog(s) as the user requests them. This dialog, as it is the main dialog for the dialog set, will be responsible for creating the dialog container and redirecting users to other dialogs as needed.
- SearchDialog - A dialog which manages processing search requests and returning those results to the user.
Since we only have two dialogs, we can keep it simple and put them in the PictureBot class. However, complex scenarios may require splitting them out into different dialogs in a folder (similar to how we’ll separated Responses and Models).
Navigate back to PictureBot.cs and replace your using statements with the following:
using System.Threading;
using System.Threading.Tasks;
using Microsoft.Bot.Builder;
using Microsoft.Bot.Schema;
using Microsoft.Bot.Builder.Dialogs;
using Microsoft.Extensions.Logging;
using System.Linq;
using PictureBot.Models;
using PictureBot.Responses;
using Microsoft.Bot.Builder.AI.Luis;
using Microsoft.Azure.Search;
using Microsoft.Azure.Search.Models;
using System;
using Newtonsoft.Json;
using Newtonsoft.Json.Linq;
You’ve just added access to your Models/Responses, as well as to the services LUIS and Azure Search. Finally, the Newtonsoft references will help you parse the responses from LUIS.
Next, we’ll need to replace our current method for OnTurnAsync with one that processes incoming messages and then routes them through the various dialogs.
Replace the rest of the class with the following shell:
namespace Microsoft.PictureBot
{
    /// <summary>
    /// Represents a bot that processes incoming activities.
    /// For each user interaction, an instance of this class is created and the OnTurnAsync method is called.
    /// This is a Transient lifetime service.  Transient lifetime services are created
    /// each time they're requested. For each Activity received, a new instance of this
    /// class is created. Objects that are expensive to construct, or have a lifetime
    /// beyond the single turn, should be carefully managed.
    /// For example, the <see cref="MemoryStorage"/> object and associated
    /// <see cref="IStatePropertyAccessor{T}"/> object are created with a singleton lifetime.
    /// </summary>
    /// <seealso cref="https://docs.microsoft.com/en-us/aspnet/core/fundamentals/dependency-injection?view=aspnetcore-2.1"/>
    /// <summary>Contains the set of dialogs and prompts for the picture bot.</summary>
    public class PictureBot : IBot
    {
        private readonly PictureBotAccessors _accessors;
        // Lab 2.2.3 Initialize LUIS Recognizer

        private readonly ILogger _logger;
        private DialogSet _dialogs;

        /// <summary>
        /// Every conversation turn for our PictureBot will call this method.
        /// There are no dialogs used, since it's "single turn" processing, meaning a single
        /// request and response. Later, when we add Dialogs, we'll have to navigate through this method.
        /// </summary>
        /// <param name="turnContext">A <see cref="ITurnContext"/> containing all the data needed
        /// for processing this conversation turn. </param>
        /// <param name="cancellationToken">(Optional) A <see cref="CancellationToken"/> that can be used by other objects
        /// or threads to receive notice of cancellation.</param>
        /// <returns>A <see cref="Task"/> that represents the work queued to execute.</returns>
        /// <seealso cref="BotStateSet"/>
        /// <seealso cref="ConversationState"/>
        /// <seealso cref="IMiddleware"/>
        public async Task OnTurnAsync(ITurnContext turnContext, CancellationToken cancellationToken = default(CancellationToken))
        {
            if (turnContext.Activity.Type is "message")
            {
                // Establish dialog context from the conversation state.
                var dc = await _dialogs.CreateContextAsync(turnContext);
                // Continue any current dialog.
                var results = await dc.ContinueDialogAsync(cancellationToken);

                // Every turn sends a response, so if no response was sent,
                // then there no dialog is currently active.
                if (!turnContext.Responded)
                {
                    // Start the main dialog
                    await dc.BeginDialogAsync("mainDialog", null, cancellationToken);
                }
            }
        }
        /// <summary>
        /// Initializes a new instance of the <see cref="PictureBot"/> class.
        /// </summary>
        /// <param name="accessors">A class containing <see cref="IStatePropertyAccessor{T}"/> used to manage state.</param>
        /// <param name="loggerFactory">A <see cref="ILoggerFactory"/> that is hooked to the Azure App Service provider.</param>
        /// <seealso cref="https://docs.microsoft.com/en-us/aspnet/core/fundamentals/logging/?view=aspnetcore-2.1#windows-eventlog-provider"/>
        public PictureBot(PictureBotAccessors accessors, ILoggerFactory loggerFactory /*, LuisRecognizer recognizer*/)
        {
            if (loggerFactory == null)
            {
                throw new System.ArgumentNullException(nameof(loggerFactory));
            }

            // Lab 2.2.3 Add instance of LUIS Recognizer

            _logger = loggerFactory.CreateLogger<PictureBot>();
            _logger.LogTrace("PictureBot turn start.");
            _accessors = accessors ?? throw new System.ArgumentNullException(nameof(accessors));

            // The DialogSet needs a DialogState accessor, it will call it when it has a turn context.
            _dialogs = new DialogSet(_accessors.DialogStateAccessor);

            // This array defines how the Waterfall will execute.
            // We can define the different dialogs and their steps here
            // allowing for overlap as needed. In this case, it's fairly simple
            // but in more complex scenarios, you may want to separate out the different
            // dialogs into different files.
            var main_waterfallsteps = new WaterfallStep[]
            {
                GreetingAsync,
                MainMenuAsync,
            };
            var search_waterfallsteps = new WaterfallStep[]
            {
                // Add SearchDialog water fall steps

            };

            // Add named dialogs to the DialogSet. These names are saved in the dialog state.
            _dialogs.Add(new WaterfallDialog("mainDialog", main_waterfallsteps));
            _dialogs.Add(new WaterfallDialog("searchDialog", search_waterfallsteps));
            // The following line allows us to use a prompt within the dialogs
            _dialogs.Add(new TextPrompt("searchPrompt"));
        }
        // Add MainDialog-related tasks

        // Add SearchDialog-related tasks

        // Lab 2.2.2 Add search related tasks

    }

}
Spend some time reviewing and discussing this shell with a neighbor. You should understand the purpose of each line before continuing.
We’ll add some more to this in a bit. You can ignore any errors (for now).
Responses
So before we fill out our dialogs, we need to have some responses ready. Remember, we’re going to keep dialogs and responses separate, because it results in cleaner code, and an easier way to follow the logic of the dialogs. If you don’t agree or understand now, you will soon.
Create two classes, called “MainResponses.cs” and “SearchResponses.cs” within the “Responses” folder. As you may have figured out, the Responses files will simply contain the different outputs we may want to send to users, no logic.
Within “MainResponses.cs” add the following:
using System.Threading.Tasks;
using Microsoft.Bot.Builder;

namespace PictureBot.Responses
{
    public class MainResponses
    {
        public static async Task ReplyWithGreeting(ITurnContext context)
        {
            // Add a greeting
        }
        public static async Task ReplyWithHelp(ITurnContext context)
        {
            await context.SendActivityAsync($"I can search for pictures, share pictures and order prints of pictures.");
        }
        public static async Task ReplyWithResumeTopic(ITurnContext context)
        {
            await context.SendActivityAsync($"What can I do for you?");
        }
        public static async Task ReplyWithConfused(ITurnContext context)
        {
            // Add a response for the user if Regex or LUIS doesn't know
            // What the user is trying to communicate
        }
        public static async Task ReplyWithLuisScore(ITurnContext context, string key, double score)
        {
            await context.SendActivityAsync($"Intent: {key} ({score}).");
        }
        public static async Task ReplyWithShareConfirmation(ITurnContext context)
        {
            await context.SendActivityAsync($"Posting your picture(s) on twitter...");
        }
        public static async Task ReplyWithOrderConfirmation(ITurnContext context)
        {
            await context.SendActivityAsync($"Ordering standard prints of your picture(s)...");
        }
    }
}
Note that there are two responses with no values (ReplyWithGreeting and ReplyWithConfused). Fill these in as you see fit.
Within “SearchResponses.cs” add the following:
using Microsoft.Bot.Builder;
using System;
using System.Collections.Generic;
using System.Linq;
using System.Threading.Tasks;
using Microsoft.Bot.Schema;

namespace PictureBot.Responses
{
    public class SearchResponses
    {
        // add a task called "ReplyWithSearchRequest"
        // it should take in the context and ask the
        // user what they want to search for


        public static async Task ReplyWithSearchConfirmation(ITurnContext context, string utterance)
        {
            await context.SendActivityAsync($"Ok, searching for pictures of {utterance}");
        }
        public static async Task ReplyWithNoResults(ITurnContext context, string utterance)
        {
            await context.SendActivityAsync("There were no results found for \"" + utterance + "\".");
        }
    }
}
Note here a whole task is missing. Fill in as you see fit, but make sure the new task has the name “ReplyWithSearchRequest”, or you may have issues later.
Models
Due to time limitations, we will not be walking through creating all the models. They are straightforward, but we recommend taking some time to review the code within after you’ve added them. Right-click on the “Models” folder and select Add>Existing Item. Navigate to “lab02.2-building_bots/resources/code/Models”, select all three files, and select “Add.”
At this point, your Solution Explorer should look similar to the following image:
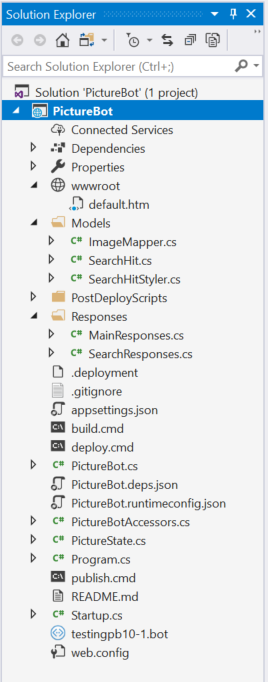
Are you missing anything? Now’s a good time to check that you have all of the files, but you can ignore any other errors (for now).
Lab 1.5: Regex and Middleware
There are a number of things that we can do to improve our bot. First of all, we may not want to call LUIS for a simple “search pictures” message, which the bot will get fairly frequently from its users. A simple regular expression could match this, and save us time (due to network latency) and money (due to cost of calling the LUIS service).
Also, as the complexity of our bot grows and we are taking the user’s input and using multiple services to interpret it, we need a process to manage that flow. For example, try regular expressions first, and if that doesn’t match, call LUIS, and then perhaps we also drop down to try other services like QnA Maker or Azure Search. A great way to manage this is through Middleware, and the SDK does a great job supporting that.
Before continuing with the lab, learn more about middleware and the Bot Framework SDK:
Ultimately, we’ll use some middleware to try to understand what users are saying with regular expressions (Regex) first, and if we can’t, we’ll call LUIS. If we still can’t, then we’ll drop down to a generic “I’m not sure what you mean” response, or whatever you put for “ReplyWithConfused.”
To add the middleware for Regex to your solution, create a new folder called “Middleware,” and add the contents of the “Middleware” folder (you can find this under resources > code) to your solution. You can also use this middleware in your future projects!
In “Startup.cs”, below the “Add Regex ability below” comment within ConfigureServices, add the following:
                middleware.Add(new RegExpRecognizerMiddleware()
                .AddIntent("search", new Regex("search picture(?:s)*(.*)|search pic(?:s)*(.*)", RegexOptions.IgnoreCase))
                .AddIntent("share", new Regex("share picture(?:s)*(.*)|share pic(?:s)*(.*)", RegexOptions.IgnoreCase))
                .AddIntent("order", new Regex("order picture(?:s)*(.*)|order print(?:s)*(.*)|order pic(?:s)*(.*)", RegexOptions.IgnoreCase))
                .AddIntent("help", new Regex("help(.*)", RegexOptions.IgnoreCase)));
We’re really just skimming the surface of using regular expressions. If you’re interested, you can learn more here.
Without adding LUIS, our bot is really only going to pick up on a few variations, but it should capture a good bit of messages, if the users are using the bot for searching and sharing and ordering pictures.
Aside: One might argue that the user shouldn’t have to type “help” to get a menu of clear options on what the bot can do; rather, this should be the default experience on first contact with the bot. Discoverability is one of the biggest challenges for bots - letting the users know what the bot is capable of doing. Good bot design principles can help.
MainDialog, Again
Let’s get down to business. We need to fill out MainDialog within PictureBot.cs so that our bot can react to what users say they want to do.
Based on our results from Regex, we need to direct the conversation in the right direction. Read the code carefully to confirm you understand what it’s doing, then paste in the following code below the line // Add MainDialog-related tasks:
        // If we haven't greeted a user yet, we want to do that first, but for the rest of the
        // conversation we want to remember that we've already greeted them.
        private async Task<DialogTurnResult> GreetingAsync(WaterfallStepContext stepContext, CancellationToken cancellationToken)
        {
            // Get the state for the current step in the conversation
            var state = await _accessors.PictureState.GetAsync(stepContext.Context, () => new PictureState());

            // If we haven't greeted the user
            if (state.Greeted == "not greeted")
            {
                // Greet the user
                await MainResponses.ReplyWithGreeting(stepContext.Context);
                // Update the GreetedState to greeted
                state.Greeted = "greeted";
                // Save the new greeted state into the conversation state
                // This is to ensure in future turns we do not greet the user again
                await _accessors.ConversationState.SaveChangesAsync(stepContext.Context);
                // Ask the user what they want to do next
                await MainResponses.ReplyWithHelp(stepContext.Context);
                // Since we aren't explicitly prompting the user in this step, we'll end the dialog
                // When the user replies, since state is maintained, the else clause will move them
                // to the next waterfall step
                return await stepContext.EndDialogAsync();
            }
            else // We've already greeted the user
            {
                // Move to the next waterfall step, which is MainMenuAsync
                return await stepContext.NextAsync();
            }

        }

        // This step routes the user to different dialogs
        // In this case, there's only one other dialog, so it is more simple,
        // but in more complex scenarios you can go off to other dialogs in a similar
        public async Task<DialogTurnResult> MainMenuAsync(WaterfallStepContext stepContext, CancellationToken cancellationToken)
        {
            // Check if we are currently processing a user's search
            var state = await _accessors.PictureState.GetAsync(stepContext.Context);

            // If Regex picks up on anything, store it
            var recognizedIntents = stepContext.Context.TurnState.Get<IRecognizedIntents>();
            // Based on the recognized intent, direct the conversation
            switch (recognizedIntents.TopIntent?.Name)
            {
                case "search":
                    // switch to the search dialog
                    return await stepContext.BeginDialogAsync("searchDialog", null, cancellationToken);
                case "share":
                    // respond that you're sharing the photo
                    await MainResponses.ReplyWithShareConfirmation(stepContext.Context);
                    return await stepContext.EndDialogAsync();
                case "order":
                    // respond that you're ordering
                    await MainResponses.ReplyWithOrderConfirmation(stepContext.Context);
                    return await stepContext.EndDialogAsync();
                case "help":
                    // show help
                    await MainResponses.ReplyWithHelp(stepContext.Context);
                    return await stepContext.EndDialogAsync();
                default:
                    {
                        await MainResponses.ReplyWithConfused(stepContext.Context);
                        return await stepContext.EndDialogAsync();
                    }
            }
        }
Hit F5 to run the bot. Test it by sending commands like “help”, “share pics”, “order pics”, and “search pics”. If the only thing that didn’t give you the expected result was “search pics”, everything is working how you configured it. “search pics” failing is the expected behavior at this point in the lab, but why? Have an answer before you move on!
Hint: Use break points to trace matching to case “search”, starting from PictureBot.cs.
In the next lab, we will address the search error.
Get stuck? You can find the solution for this lab under resources > code. We recommend using this as a reference, not as a solution to run, but if you choose to run it, be sure to add the necessary keys (in this section, there shouldn’t be any).
Continue to 2_Azure_Search
Back to README